Apples and pears are available at supermarkets throughout the year at reasonable prices, so why grow your own? Well, commercial fruit farmers focus on varieties with middle-of-the-road tastes, that will appeal to a wide audience. A variety that has great taste, but looks unattractive, or does not store well, will simply not be grown commercially. Growing your own apples and pears gives you access to varieties that are seldom or never available in shops.
This is a blog post by ‘Max and Max’. Together they tapped into Max’s decades of professional fruit tree experience and documented what might be helpful to home gardeners who grow apples and pears. One Max learnt a lot. The other Max is thanked very much for his time and sharing his knowledge.
Planning, buying and planting
Ideally you begin to plan for a new fruit tree in April - May. It is the best time to determine what fruit tree to get and order it, because most nurseries can only get a certain number of trees of the varieties they sell. If you leave it too late, you may not be able to get precisely what you want.
In Tasmania we can get a wide variety of apple trees
- Eating apple – Gravenstein, Golden Delicious, Lady-in-the-Snow, Cox’s Orange Pippin
- Cooking apples – Granny Smith, Sturmer
- Early apples – Gravenstein, Gala
- Late apples - Sturmer, Pippin, Red Fuji,
- Apples that become ripe over a long period of time – Granny Smith,
- Sweet apples – Golden Delicious, Gravenstein
- Tart apples – Granny Smith, Sturmer
- Apples that store well – Jonagold, Fuji, Granny Smith
 |
| One of Max K's grafted apple trees |
In order of ripening here are some of the pear varieties available in Tasmania
Williams, Packham’s, Comice, Beurre Bosc, Winter Cole, Josephine, Winter Nelis, Corella (source: The Complete Book of Fruit Growing in Australia – see reference section).
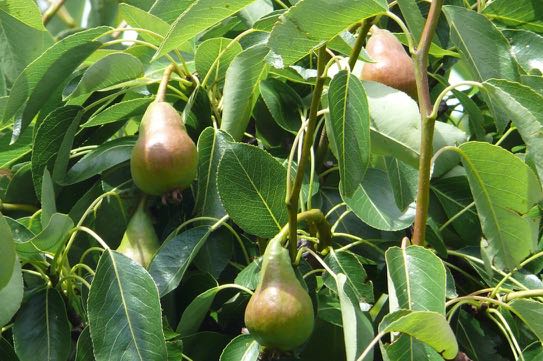 |
| Healthy looking Beurre Bosc pears |
Planning and preparing for your new tree
- Consider a dwarf tree (that is a tree that will stay small because it is grafted onto 'dwarfing root stock'). It will take less space and will be easier to maintain.
- Consider espaliering the tree, so you can put it against a warmth-generating brick wall or make the best use of limited space.
- Find a spot with full sun where the tree will be able to reach a good size without shading other plants that need sun and prepare it for planting a few months from now. Explore the spot by digging a fairly substantial hole. Assess the quality of the soil. Fill the hole with a bucket of water. If the water is still there a few hours later, find another spot. Are you finding that roots of other trees have claimed this spot? If so, your new fruit tree may have too much competition from nearby trees.
- Fill the hole with a mixture of soil and mature compost and/or mature manure. Let this settle for a few months, until mid-winter, when you will plant your tree.
The tree will be dormant and bare-rooted when it is ready for pick-up at the nursery in July - August.
At the nursery, before taking it home, inspect it, including the roots. Does it look healthy and disease-free? If your tree is grafted, also inspect the graft. There should be no split bark or gum oozing from the graft. Ask for a different tree if you are not happy.
After arriving home, it is best to plant your tree as soon as possible. If you can’t do it immediately, you can ‘heel’ it in a temporary position for up to a few weeks by burying the roots in some loose soil and keeping the soil moist.
To plant your young tree do the following
- Remove all saw dust or other moisture-retaining materials around the roots.
- Don’t prune the tree’s roots unless they are very long.
- Soak the tree overnight in a bucket of water + seaweed solution.
- The next day, plant it deep enough, so all the roots are covered by at least 10 centimetres of soil. Make sure its ‘graft union’, that is the spot where your variety was grafted onto ‘root stock’, is well above ground.
- Immediately prune the young tree hard. Shorten the main branches by 50%, and remove weak or broken branches. Most fruit tree growers do not prune their young trees at all before they go to the customer, because they know that customers like big well-developed young trees. Many people, on receiving their young tree, also don't prune it. If the young tree is not pruned when it is put in the ground, its minimal root system will struggle to feed all the branches when it wakes up out of dormancy.
- Your tree may have come with a label. Check its tie, and remove it if there is any chance it may strangle the branch it is on as that branch widens over time.
- Put stakes in the ground on either side, and tie the tree to the stakes with flexible tree ties.
- Immediately surround the young tree with mesh if wildlife is a problem in your garden.
- The young apple or pear tree will focus on forming a good root system. Don’t be disappointed if not a lot happens above ground, and don’t expect any fruit.
- Water a young tree well during its first year as its root system may not yet be developed enough to cope with long periods without rain.
- Wait with compost, manure and foliar feeding until the tree is recovering well in mid summer.
Trees in pots: outside the July - August period you will find that fruit trees at nurseries are in pots and have leaves. That is fine! But do not just plant them straight from the pot into the garden, because they may have been in the pot for quite some time. Remove most of the soil, straighten roots, cut off twisted ends, give the tree a hard prune (so it has less foliage to take care off while it recovers), and then spread out the roots in a hole that is big enough to allow roots to go outwards.
If you ever come across a bare-rooted fruit tree with leaves (ie. it is not dormant anymore), don’t buy it, as it will have been out of soil for too long, and it may struggle or die.
General cultural notes for apple and pear trees
Apple and pear trees like fertile, free-draining, pH-neutral soil, full sun and temperate conditions.
Apple trees produce fruit buds on wood 2 years old and older. Little branches called ‘spurs’ can produce fruit buds for 6 to 10 years. The photo below shows a spur with a fruit-bud on the right, and a smaller leaf-bud on the left. One fruit-bud produces a cluster of up to 5 apples.
 |
| A leaf bud with a fruit bud |
 |
| Bitter Pit in an Early Victoria apple |
Once you see this in fruit it is too late to correct. Regular sufficient irrigation and an application of lime at the start of the season will make sure Bitter Pit is avoided (thank you Brigitta and Margaret x 2 ).
Pruning
Ideally a young apple or pear tree is ‘trained’ to take on a particular shape and height in its first four years in the ground. If this is done well, and its shape is right, the tree then needs less pruning in subsequent years. Because it is pruned less, the tree is not encouraged to ‘grow wood’. Instead, it will spend more energy ‘growing fruit’. Ideally in old age, a well-shaped apple or pear tree does not need a lot of pruning and continues to produce well.
Pruning provides ventilation and therefore is a preventative measure against diseases. It also makes pest control, netting, and picking of fruit far less arduous.
General pruning rules
- Use sharp clean secateurs as described in section getting the best out of your secateurs in blog post https://foodgardengroup.blogspot.com/2016/05/pruning-berries.html
- For a young tree focus on getting the shape of the tree right, not on getting fruit.
- Make clean wounds that are as small as possible.
- Do not treat wounds with wound sealants. It might do more harm than good.
- To avoid taking diseases from one tree to the next, before starting on the next tree, wipe secateurs with methylated spirits or a mix of water and household bleach.
Prune non-espaliered apple and pear trees as follows
- Continually work towards making the tree a vase shape.
- Cut away diseased and damaged wood.
- Provide good ventilation by cutting branches in the centre of the tree and those that begin to go inwards.
- Cut away branches that cross each other, and that may damage each other in windy conditions.
- Don’t allow more than five or six main side-branches to form the vase off the central stem.
- Do not cut too much off the ends of the main side-branches.
- Cut branches that come off these main side-branches to around 200 millimetres (9 inches in the old language). On these shortened branches usually at least one bud will develop into a fruit-bud.
- If a tree has been allowed to grow too high, gradually decrease its height over a number of years by cutting the top 30 centimetres off each branch, once a year, for a number of years. You can of course cut more, but then the tree will spend most of its energy the following season trying to regrow all that wood. The result will be less fruit.
The most common type of espalier found in gardens is the ‘simple horizontal cordon’ espalier (see photo below). There are other espalier shapes – for more info see for instance
Prune espaliered apple and pear trees as follows
- Over time train the tree so its main horizontal branches go along lines that are approximately 40 centimetres apart. If the lines are closer together than that, foliage above will shade lower branches.
- When the tree is young focus on getting promising branches to go along the horizontal lines, but don’t bend branches too much to achieve this. The tree’s sap needs to turn this corner. The corner acts like a break. If the bend is too strong sap flow will slow down. Growth and fruit forming along these long branches will be hindered.
- Make sure that horizontal branches don’t actually go towards the ground.
- Cut away all vertical branchlets that go down from the horizontal main branches.
- Cut away diseased and damaged wood.
- Prune vertical branches that go up from the horizontal lines to around 25 centimetres long, so they are not in the shade of the line above. For easy measurement, that is just a bit longer than the length of your secateurs. If you prune these branchlets too much the sap flow in them will be too strong and they will have too much growth.
 |
| an example of an espaliered apple tree |
I thought ‘wow, this is a perfectly espaliered tree’. Now I know that, actually, it is not perfect. Can you spot why?
There is not enough distance between some of the horizontal branches. Also, the sap, going from the main stem to the horizontal branches has to go through bends that are a bit tight. It may explain why some of the horizontal branches are a bit thin.
Working with nature is never without challenges. The perfectly-espaliered tree may not exist.
The espalier in the photo could be improved by completely removing the bottom horizontals and thinning the side branches on the top horizontals.
The optimum time for pruning
People used to prune their fruit trees when they were dormant. It is now thought that it is better to do this after cropping, but before the tree goes dormant, so the tree has time and energy to ‘heal its wounds’ before it goes dormant.
‘Winter pruning’ and ‘summer pruning’
The pruning discussed above is known as ‘winter pruning’. In addition to this, one can prune in summer. ‘Summer pruning’ is shortening or removing over-vigorous laterals and generally tidying up the tree while it is in leaf. Winter pruning is essential. Summer pruning, by comparison, is ‘fine-tuning’.
Grafting
Imagine having ten apple trees, one apple variety per tree. That might be the way to go if you want heaps of apples of each variety. However, in a tenth of the space, and with far less maintenance, you can have just one tree with ten varieties grafted onto it.
Most nursery-bought apple and pear trees are grafted. Good grafting combines the qualities of 'root-stock' (might be: vigorous root system, disease resistance or ‘dwarfing’) with the qualities of 'top-stock' (vigorous growth, good quality fruit). The mix enhances the best qualities of both plants.
Most people find that, after learning the basics, grafting is a matter of gaining hands-on experience. It is very rewarding when your first graft takes! Grafting allows you to create your own unique tree.
Grafting enables you to create your own unique tree
- have a succession of varieties on the one tree that ripen from early to late in the season
- and/or combine your personal favourites
- and/or combine eating-apples with cooking-apples
- and/or combine varieties that cross-pollinate well
The number of varieties you can graft onto one tree is only limited by the size the tree will become if you give all varieties a chance to prosper.
The most common ways of grafting are top grafting (also called bark grafting), whip and tongue grafting and bud grafting. You can find info about each of these technique, plus general advice, photos, tools and referrals to further info in Food Garden Group blog post A Look at Grafting.
It is obvious when you think about it, but for a graft to work, the tree’s energy-providing sap must be flowing through the connection between the tree and the graft. If you apply a graft on a dormant tree, the graft will dry out and die. If you graft when the tree’s sap flow is very strong, sap may overflow at the connection point, and the graft may also not get what it needs and die. Blog post A Look at Grafting discusses what the best time is for the various types of grafting.
One graft may dominate the others: different varieties of apples and pears grow at a different rate. If you have a tree with multiple grafts, be aware that one graft might grow much faster than the others. This can result in a virtually single variety tree.
The best way to avoid this is to only graft together onto a tree varieties that have a similar growth rate. The Book of Apples by Morgan and Richards (see reference section at the end of this blog post) contains a long list of apple varieties, many of which are available in Australia, and rates the vigour of each variety.
If your tree has a run-away graft, prune this graft hard in the middle of summer to even up growth.
Some of the places where you can get scion wood and root stock in Tasmania:
- Woodbridge Fruit Trees ( https://www.woodbridgefruittrees.com.au) at Cygnet sells a wide range of quality fruit trees. They also sell root stock for grafting scion wood onto and they run espalier and grafting workshops each winter.
- The Lost Seed ( https://www.thelostseed.com.au/more-info-2/) is another excellent Tasmanian supplier. Every year up to 30 June they take orders for scion wood, in other words, what you graft onto root stock.
- Free Settlers Nursery ( https://www.freesettlersnursery.com) at Gretna in the Derwent Valley sells grafted apple, pear and quince trees, root stock, and scion wood of many old apple, pear and quince varieties!
Thinning
Fruit needs to be thinned every season because
- Not thinning will lead to a large crop that season, followed by a small crop the following season. People with fruit trees will be familiar with ‘biennial bearing’: the pattern of fruit trees producing well one year, not much the next, then well again and so on. Thinning every year balances fruit numbers, so you have a good crop of tasty fruit every year.
- Thinning allows the remaining fruits to become bigger and tastier.
- Not thinning can ruin your tree, in particular young trees. In my garden I ruined a fruit tree by allowing a far too heavy crop to come to maturity without thinning. One day a major branch simply collapsed under the weight. The tree nearly died.
- Don't thin fruit-buds or flowers, but wait for small apples to appear, and thin then, because you don’t know how many apples you are going to have until you see the result of pollination.
- The best time to thin fruits is soon after they form. The earlier you thin them, the more time the remaining fruits have to become a quality crop without competition from all the other ones. Thin as early as you can. For apples that means in November or early December.
- As with pruning: be ruthless. For every cluster of up to 5 apples or pears, leave 2 initially, and remove one more (yes, leaving just 1 out of 5!) if there are still too many fruits on the tree.
- When choosing which fruits to remove, make sure the imperfect ones or the small ones are the first ones to go.
 |
| before thinning |
 |
| the same branches after thinning |
Harvest and Storage
Apples and pears continue to ripen after picking.
It is best to pick pears when almost ripe but still firm, and then let them ripen in moderate temperatures.
An apple is ready to be picked when the top of the stalk snaps off easily when you move the fruit upwards gently. Some apple varieties ripen really early. In contrast, Granny Smith can be left on the tree until well into winter, even after leaf-fall, if they can be protected from birds.
About storing apples and pears Max K remembers:before sending them off they used to wrap each fruit individually in paper to avoid them touching each other.
The best way to store apples and pears
- Make sure the fruits don’t touch each other. One way to achieve this is to wrap each individual fruit in newspaper.
- Store them in a covered box, out of direct sunlight, in a cool space, with good ventilation, and low humidity.
Pest Control
It was decided not to include pest control in this blog post because a few sentences on each pest would not provide enough information, and a thorough discussion of each pest would make this blog post far too long.
Pest control is covered in other Food Garden Group blog posts, for example:
The Book of Apples by Morgan and Richards: this seminal work contains in one unique volume, the most wide-ranging history of apples ever written. It also contains a detailed survey of over 2,000 of the world's apple varieties, including many Australian ones.
- About Codling Moths - https://foodgardengroup.blogspot.com/2017/06/outsmarting-codling-moth.html
- About Pear Slugs - https://foodgardengroup.blogspot.com/2018/07/controlling-pear-and-cherry-slugs.html
Recommended further reading
The Book of Apples by Morgan and Richards: this seminal work contains in one unique volume, the most wide-ranging history of apples ever written. It also contains a detailed survey of over 2,000 of the world's apple varieties, including many Australian ones.
The Complete Book of Fruit Growing in Australia by Louis Glowinski: this excellent book covers a wide range of fruits and is written for Australian varieties and conditions. It has an excellent chapter about apples and pears, that is much more in-depth than this blog post.
No comments:
Post a Comment
Note: Only a member of this blog may post a comment.