In days gone by mankind developed many creative techniques to manipulate plants into producing bigger or better crops. Grafting is one of these techniques and it was developed over many centuries. This is an introduction to grafting fruit trees.
Fruit trees grown from pips can't be trusted to produce good quality great tasting fruit, and it can take many years for any fruit to appear. Some fruit trees grown from pips never produce fruit. This is why most nursery-bought fruit trees are grafted.
Good grafting combines the qualities of 'root-stock' (vigorous root system, disease resistance, in some cases 'dwarfing') with the qualities of 'top-stock' (vigorous growth, good quality fruit). The mix enhances the best qualities of both varieties.
Grafting can also be used to create one tree with multiple varieties. The benefits are:
- It saves a lot of space compared to having a separate tree for each variety
- It enables you to create your own unique tree
- You can have a succession of varieties on one tree that ripen from early to late in the season
- You can combine your personal favourites
- You can combine eating-fruit with cooking-fruit
- You can combine varieties that cross-pollinate well and increase your crop
The number of varieties you can graft onto one tree is only limited by the size the tree will become if you give all varieties a chance to prosper.
For grafting you need
- A grafting knife. Grafting knives can be curved (photo 1) or straight (photo 2). What you choose depends on what feels good in your hand. Make sure that the knife locks when open, so it can not move in relation to the handle.
- A pair of good clean secateurs.
- Grafting tape, also called 'budding tape'. It is special tape that can be stretched, and that gradually disintegrates when exposed to the weather. You can buy this at most hardware stores. Grafting tape has the advantage that it will deteriorate over time and then fall off. You won't have to remove it. Instead of grafting tape you can use electrical tape, but that you will need to remove after six months.
- A fruit tree that will be the host.
- One or more pieces of 'scion wood' (pencil-thick twigs with between 3 - 6 buds of the variety that you wish to add to the host).
 |
| A good quality clean and sharp grafting knife |
- A sharpening stone to keep the grafting knife nice and sharp. You can use a conventional sharpening stone or a more specialised one like the small tool with the blue handle in the photo below. It has a super fine diamond layer (the grey area). Because it is small it is easy to hold and you can easily get to all parts of the cutting edge of the knife. It is really important to always use a sharp knife because decisive straight cuts are the best cuts.
 |
| A straight grafting knife and sharpener |
- For bark grafting (explained below) you need grafting sealant (sealing wax or horticultural tar-paint). It is used to cover the tree's wounds. In Tasmania Roberts, Hollander Imports, Woodbridge Fruit Trees, and some hardware stores sell this. Bees wax can be used as grafting sealant.
It's all about cambium layers
All trees (in fact all plants) have a green layer immediately under the bark that contains tiny channels through which water and nutrients are taken to the leaves. This green layer is called cambium.
Grafting is matching up the cambium layers of host and scion wood, so the scion wood can begin to use the cambium of the host tree to get its water and nutrients. Ideally the stem thickness of the host branch and scion wood piece are the same, so the cambium in both meets all around.
Drilling a hole in the central wood of a branch and fitting a scion wood piece in it will not work!
If scion wood is narrower than the host branch, line up one side of the scion wood, so cambium layers meet on that side of the host branch.
The three most common grafting techniques
The most commonly used grafting techniques are whip and tongue grafting, top work (also called bark grafting) and bud grafting.
It is obvious when you think about it, but for a graft to work, the tree’s energy-providing sap must be flowing through the connection between the tree and the graft. If you apply a graft on a dormant tree, the graft will dry out and die. If you graft when the tree’s sap flow is very strong, sap may overflow at the connection point, and the graft may also not take. For each of the three grafting techniques there is a best time to perform it. Grafting at the right time contributes to your chances of success.
One important observation before we look at the three techniques: when grafting always be aware which end of a piece of scion wood is 'up' by observing which way buds are pointing. If you graft a piece of scion wood up side down, the graft may not take. If it does, it will for ever want to upside-down itself to correct the problem, resulting in a strangely shaped branch!
1. Whip and tongue grafting
For this technique it is best if the diameter of the scion wood is the same as that of the host branch.
Whip and tongue grafting is used to graft scion wood onto root stock (see photo below).
 |
| whip and tongue grafting onto root stock |
It can also be used to graft scion wood onto thin branches of mature trees (see photo below).
 |
| Whip and Tongue grafting |
The photo below shows a young Apple tree. The bottom circle shows where a good fruiting variety was grafted onto root-stock, using the whip and tongue technique. Then, recently, Max K added a Fuji scion where the middle circle is in the photo. The top circle shows the top of the scion, which he covered with a bit of grafting sealant. This is only needed if the top is freshly cut.
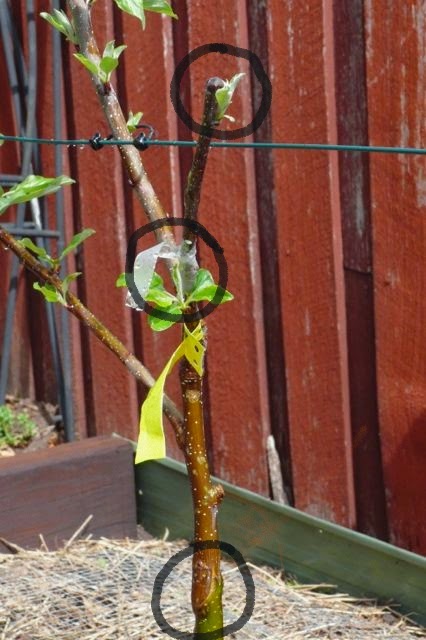
The grafting tape can be left on the graft indefinitely. It will gradually disintegrate while exposed to the weather.
Here are the best times for whip and tongue grafting:
- Japanese and early plum: second half of July.
- Apricot and late plum: first half of August.
- Apples, Pears and Cherries: September or early October before buds burst.
The photo below is from a really good description of whip and tongue grafting at https://morningchores.com/grafting/
 |
| a is the host, b is the scion wood piece |
For a good YouTube video demonstrating whip and tongue grafting go here: http://vimeo.com/62573841
2. Top work grafting, also called bark grafting
This is the preferred technique when adding a new variety to older trees where it is no problem to cut a thick branch. Here is an example:

Max K top-grafted two Sturmer scions onto an apple tree in a food garden at Howrah. The photo on the left shows the top work grafts as Max was finishing them off.
The photo on the right shows the same branch one year later. Near the bottom of the photo you can see the brown sealing wax on top of the main branch. In one year the left-hand graft has grown into a healthy success with multiple branches. The right-hand scion was the weaker one and has been cut off so it does not compete with the left-hand scion.
Top work grafting is also widely used to revitalise old fruit trees. Rather than pulling them out and starting from scratch with new young trees, their established root system can give them a new lease of life. Here is an example:

In Annie's front yard at Kettering was an Apple tree that had been neglected for many years (the photo on the left). Max did 'a severe prune' that only left the main trunk with 6 major branches. He then top-grafted 2 scions onto each branch (the photo on the right).
With apple and pear trees it is best to leave one limb on the tree completely in tact at the time of grafting. It is called the ‘nurse limb’. If with apple and pear trees you don't have a nurse limb, sap may flood the grafts, and they may not make it. If you leave a nurse limb, the sap has somewhere to go. The nurse limb can be removed when the new grafts are well established.
For top work grafting scion wood is cut like in the photo below.
 |
| Piece of scion wood cut for bark grafting |
It is then inserted just under the bark of a branch that is much thicker than the scion. It is crucial that the cambium layer of the scion wood touches as much of the cambium layer of the host branch as possible.
There are a number of ways to make the cuts. The photos above and below shows one way:
 |
| An example of bark grafting |
Grafting tape is then used to create a tight bond between branch and scion wood (see photo below).
 |
| Top work grafting, also called bark grafting |
After the scion has been fitted and grafting tape applied to make it a tight fit, grafting sealant is applied to all freshly cut surfaces that are exposed to the air so the wound is sealed (see photo below).
 |
| Grafting sealant is applied to all fresh wood exposed to the air |
A good YouTube video of top grafting can be seen here: https://www.youtube.com/watch?v=b-iyXqG10YU
3. Bud grafting
In bud grafting a bud with a bit of wood around it (referred to as 'bud wood') is cut out of a piece of scion wood and then fitted into a branch of a host branch, as shown in the photo below. Ideally the piece of bud wood fits the host branch precisely.
Apricots, Peaches and Nectarines are not usually grafted using the whip and tongue or bark grafting techniques because of the pithy nature of the scion wood and because they tend to gum. Bud grafting is the method used for this fruit.
Citrus and Avocado are other examples of fruit tree varieties for which bud grafting is the best type of grafting.
If the bud is at the bottom of a leaf stalk, remove the leaf, but leave about 10 millimetres of leaf stalk. This bit of stalk can then be used as an easy handle for you when putting the bud in place.
Because the bud wood is such a small piece of wood it can easily dry out. To avoid this, make this type of graft one quick procedure of cutting the bud wood, then fitting it onto the host without any storage or delays. If this is not possible, wrap the bud wood in damp paper in a plastic bag and store it in a cool place, but only for a few days or the graft might not work.
After positioning the budwood on a branch of its new host, tape it with sealing tape.
Good watering must follow all bud grafting. The bud will shrivel up and die if you don't.
 |
| Bud grafting: bud wood (right) is fitted into a host branch (left) |
Bud grafting is the preferred method of grafting for most commercial nurserymen because you only need one bud per graft. With one piece of scion wood you can make three or more bud grafts.
After fitting the bud you put budding tape around the bud. Ideally you leave the bud uncovered, or have it covered with just one layer of not-too-tight tape, while the surrounding area is tightly wrapped.
After fitting the bud you put budding tape around the bud. Ideally you leave the bud uncovered, or have it covered with just one layer of not-too-tight tape, while the surrounding area is tightly wrapped.
Bud grafts are applied to all types of fruit trees in summer. The second half of January or the first half of February is the best time. Good watering must follow.
The following spring, when the bud has begun to develop, you cut off the branch just above the bud.
A Good YouTube video of bud grafting can be seen here: https://www.youtube.com/watch?v=8rhb8QBfjws
Always graft within the species
You can only graft a scion successfully onto a host that is of the same species. You can graft a Pear onto an Apple, or an Orange onto a Lemon, but not an Apricot onto an Apple.
Match varieties within the species
Every variety has a different 'vigour', that is the rate at which it grows. If you are thinking of grafting multiple varieties onto a host, it is best to choose varieties of the same vigour, so you don't have one variety completely out-growing the other(s).
'Growth habit' (upright, spreading or normal) is also important to consider. Ideally you combine varieties that have the same vigour and growth habit. Keep this in the back of your mind, but don't let it put you off grafting experiments. You will learn over time!
There are books that can be a major resource here. Here is one: The book of Apples (Joan Morgan and Alison Richards - Edbury Press Limited UK) describes over a thousand apple varieties, many of which are available in Australia. It will be a great help in making a considered choice.
Where to put your graft on the tree?
That is an easy question when you add a graft to root stock: remove any side stems the root stock might have, and put the graft at the end of the main stem, perhaps 60 - 75 centimetres from the ground.The question needs a lot more consideration when you add a graft to an established fruit tree. When considering on what branch and where on a branch to graft a piece of scion wood, two things are important:
- There will need to be good sap flow to the new graft. The further a graft is away from the main stem, and the further it is away from the ground, the less vigorous sap flow will be.
- By putting the graft in a particular position on a particular branch you in fact decide that in years to come you will not cut that branch between the stem of the tree and the graft (because then you lose the graft). Presenter Steven F made this important point during a recent FGG grafting workshop.
Look at the shape of the tree before adding a graft. Choose a branch that you are sure you want to be part of the tree for years to come. Don't put the graft at the end of a long branch, for sap flow reasons, and because, when the graft develops, the branch will become even longer, perhaps too long.
To give your new graft the best possible chance ..
The best graft may not take if nearby branches knock the graft out of place in windy conditions. If there are nearby branches that may do this, cut them away!
Side branches of your new graft's host branch will compete with your all-important new graft for water and nutrients. Cut them away if they are close to the graft.
If you are starting a new tree by grafting onto root stock, you could consider providing extra support for the graft with a firm stick in the ground and flexible twine in a few place along the stem of the young tree. This would be useful if the young tree is in a windy position.
Would you like to have a go?
Grafting can be really rewarding and exciting if it works, but it can only be learnt by having a go, persistance, and learning through trial and error. Over time you will develop a steady hand and an eye for the size and shape of the cuts that are required.
The Food Garden Group held a free-of-charge grafting workshop for its members recently. This workshop may be repeated next year in July.
Woodbridge Fruit Trees at Cygnet, Tasmania offers grafting workshops in winter. They are really good workshops that allow you learn and try tools and techniques. Here is more info about these workhops: https://www.woodbridgefruittrees.com.au/19-workshops .
Obtaining root stock and scion wood
The best opportunity to collect scion wood is when a productive fruit tree of the desired variety is pruned in autumn or winter. The tree from which you collect the scion wood needs to be dormant or well on its way to dormancy. Select branches that are over one year old (the ones with slightly darker skin), because scion wood with young soft wood will not be successful. Cut pieces with 3 - 6 buds, up to 20 centimetres long.
Scion wood pieces can be kept viable for 3 - 4 months by wrapping them in damp paper, then putting them in a sealed plastic bag, and keeping them in the fridge.
Here is where you can buy root stock and scion wood in Tasmania:
- Woodbridge Fruit Trees sells root stock at https://www.woodbridgefruittrees.com.au/18-rootstocks.
- Tahune Fields Nursery sells scion woods of an impressive number of Apple, Pear, Quince and Nashi varieties. Orders are taken each year before the end of June via admin@tahunefields.com.au or land line 0362 664474.
- Free Settlers Nursery (https://www.freesettlersnursery.com) at Gretna in the Derwent Valley sells root stock and scion wood of many old varieties of apple, pear and quince trees!
More info about scion wood can be found here: https://www.thelostseed.com.au/more-info-2/ (the company won't be able to send scion wood to Tasmania for quarantine reasons).
Thank you, Max K, for your valuable information and many of the grafts shown in this blog post.
Thank you, Steven F and Alistair P, for providing additional info that allowed me to further update this blog post.
Thank you, Annie, for the photos you emailed me.
Thank you, Marg, for giving me access to your garden.
Happy grafting!
Thank you, Annie, for the photos you emailed me.
Thank you, Marg, for giving me access to your garden.
Happy grafting!
No comments:
Post a Comment
Note: Only a member of this blog may post a comment.